

(This article was originally published in Mother Earth News, written by David Braden in 2014)
According to the literature, hügelkultur can remain fertile for up to 30 years without adding new materials. However, it can be difficult to plant directly into the dense structure of logs and branches, especially in the early stages before the system has fully decomposed and softened. We call our latest experiment a hügel mulch. It is a base of logs and branches covered with a wood chip sheet mulch that should give us many years of growing with very little labor beyond planting and harvesting.
At the Living Systems Institute we work with the theory that nature maintains a habitat for a whole soil ecosystem that retains nutrients. By “whole soil ecosystem” we mean a complete community of organisms, including bacteria, fungi, insects, worms, and decomposers, that cycle nutrients through complete growth, decay, and regrowth cycles. The health of the garden is not understood as something added from outside, but as something maintained through habitat continuity. In this view, soil is not a medium. It is a living system.
I have been working with this concept for over ten years, and I know I can grow more vegetables with substantially less work using a deep mulch system than with any other gardening technique that involves turning the soil. In my experience, maintaining a stable habitat for that whole soil ecosystem is why it works. When soil life is protected from disturbance, it begins to function as an ongoing engine of fertility rather than a resource that must be repeatedly rebuilt.
Experimenting with Deep Mulch Systems
I started experimenting in 2004 using the permaculture technique called sheet mulching. By 2011 our gardening teams were incorporating ideas from a technique called hügelkultur. One third of our 2011 experimental sheet mulch garden was built with varying sizes of branches, sticks, and wood chips about twelve inches deep, then covered with an inch of horse manure. The section using hay has been renewed annually, while the section using only wood chips will need to be renewed this fall. The section built with branches was planted again for the fourth year in 2014 and shows no sign of slowing down.
Typically, organic gardening involves a cycle of composting, tilling in compost, planting, weeding, watering, harvesting, and removing plant debris for composting. It is a repeated labor cycle that treats soil as something to be managed from above. In contrast, deep mulch systems reverse that relationship. Instead of turning soil, we build on top of it and allow decomposition to do the mixing work over time.
We began one phase of this work with a single morning of construction. We followed the sheet mulching principles described in Toby Hemenway’s Gaia’s Garden, except we substituted woody material in place of the recommended base layers. A base of sticks and branches was laid down first, followed by a thick layer of wood chips. I then went in and “drew” pathways on top using more wood chips, and installed drip irrigation lines to stabilize moisture. From that point forward, the system required almost no intervention. Since that morning we have done nothing but plant and harvest, with an occasional mulching of volunteer plants that emerge and add additional biomass.
What is happening in this system is not simply composting in place. It is the creation of a continuously self processing soil habitat. The woody base slowly breaks down from the bottom up, feeding fungi networks that distribute nutrients across the entire bed. The wood chip layer moderates moisture, suppresses unwanted disturbance, and provides a steady carbon source that balances the nitrogen from plant growth and organic inputs. Over time, the entire structure becomes a layered soil sponge.
Deep mulch gardening also shifts the role of the gardener. Instead of constant intervention, the gardener becomes a steward of edges and inputs. Planting becomes the primary action. Harvest becomes the return. Weeding becomes minimal because most plant competition is suppressed by continuous ground cover and microbial dominance.
The long term advantage of this system is stability. Where tilled gardens often fluctuate between cycles of depletion and replenishment, deep mulch systems move toward equilibrium. Nutrients are not lost as easily to erosion or leaching because they are held within living and decaying organic layers. Water use decreases because mulch regulates evaporation. Soil structure improves because it is never mechanically disrupted.
Deep mulch gardening, whether expressed as sheet mulch or hügel mulch, is ultimately about building a permanent habitat for soil life rather than repeatedly constructing temporary growing spaces. The goal is not to control the soil, but to collaborate with the processes that already exist within it.
Over time, these systems become increasingly self sustaining. The initial labor investment creates a foundation that continues to produce food, biomass, and ecological function for years with minimal intervention. What begins as a pile of organic material becomes a living interface between decay and growth, where soil organisms do most of the work and the gardener steps into a quieter, more responsive role.
In this way, gardening shifts from a cycle of effort and exhaustion into a relationship with ongoing regeneration.
Deep Mulch Garden Details
Written By David Braden
- Laying out the Garden Space
- What is a Hugel Mulch?
- Quorum Sensing and the Liquid Carbon Pathway
- How Much Material?
- Drip Irrigation Systems
- Planting in the Deep Mulch
- No Weeds No Pests

Laying out the Garden Space
A family home needs a space for the family and friends to socialize. We can think of this as ‘enough lawn for the fourth of July party’. But it might also include space for the kids soccer practice and/or a place for the dogs to run. Next, we want to devote as much space as possible to increasing the diversity of species participating.
The diagram above uses almost all the space for garden bed except for the sitting area and the pathways. The pathways allow access to the growing area. The resulting pattern is an arrangement of “key-hole” beds.
Key Hole Beds
In a traditional garden layout (and the suggested spacing on most seed packages) there are long rows of a single crop with enough space between rows for a person to walk down the row with a hoe. Most gardeners can reach about 4 feet so if we use a 4′ wide bed we can increase the number of plants by taking out the pathways between rows within that 4 foot bed. You have all seen layouts with 4 foot wide raised beds separated by 2 foot wide path ways. In that design, we have dedicated 1/3 of the garden space to pathways. If we take those 4 foot wide beds and bend them into a circle leaving a 1 foot wide path way into the center and a 2 foot circle in the center to turn around, then we have a 10 foot diameter bed and have maximized growing space relative to pathway.

What is a Hugel Mulch?
Our goal is to use the material that others consider “yard waste”. This is the logs, branches, wood chips, and other organic matter generated on site. One way to use this material is called a sheet mulch. Another method is called a hugelkulture (German for mound or hill culture). We will also need a source of nitrogen and micro-organisms to fully form a habitat for a soil ecosystem. The following diagram shows a sheet mulch described in Toby Hemenway’s ‘Gaia’s Garden’.

A hugelkulture is just a pile of logs and sticks buried in dirt. We will not be moving any dirt but we want to include as much of this larger material as possible. The larger the material we can find the longer our bed will supply nutrients to our plants.
When we combine the two methods we get a Hugel Mulch.
Building a Hügel Mulch
- Start by soaking the area to be mulched with water.
- Spread manure over the area about 1/2 to 1 inch thick.
- Assemble a weed barrier by laying down a layer of cardboard with as little over lap as possible. Take newspaper and lay it out over the seams in the cardboard. Don’t do a lot of unfolding. Just lay it out whole sections at a time. You will want to wet the paper as it is laid out if there is any wind at all. Lay out a second layer of cardboard and cover all those seams with newspaper.
- Spread another layer of manure 1/2- to 1-inch thick.
- Keep the water running and wet each layer as you go.
- Cover the area with logs and then fill in the gaps between the logs with wood chips and smaller branches and sticks.
- Fill in any remaining gaps with wood chips.
- Spread a third layer of manure about 1-inch thick.
- Add 12 inches of wood chips and sticks on top.
- Spread a final layer of manure about 1-inch thick.
- You can now mark your pathways by laying out a line of wood chips about 2 feet wide and maybe 1 or 2 inches thick.

Quorum Sensing and the Liquid Carbon Pathway
We always want to plant our beds as soon as possible with a variety of plants. Treat no plant as a weed.
Instead welcome all volunteer plants as contributors to the health of your soil. All of these plants, both the volunteers and the ones you plant, are exuding complex carbon compounds into the soil. These exudates feed fungi and bacteria that form the basis for the soil ecosystem that in turn feeds the plants. This is known as the liquid carbon pathway.
With sufficient diversity of exudates there will be a significant jump in the microbial activity in the soil. (At least six different kinds of plants) This is known as quorum sensing. It is this difference between soil activity levels that is the difference between building fertility and depleting your soil.
At times one plant will be taking the sun that I would wish for a different plant. When that happens I pull the first plant and lay it down for mulch. It is easy to pull because it is rooted in the mulch. The longer I wait to pull it the more mulch I will have.
On that basis, there are no weeds. Only potential mulch.
How Much Material?
In addition to the materials generated on site, we can import materials. One of the best sources is wood chips generated as a by-product of tree trimming services. Your local arborist will likely deliver as much as you can use. Most stables and many goat and alpaca/lama operations are likely to make their manure piles available.
If we are building according to Toby Hemenway’s formula in Gaia’s Garden, here are the materials we will need:
One cubic yard is 3’X3’X3′. The foot print is 3’X3′ and if we want to spread it 3” deep, as we do with the manure, we have 12 layers (36”/3”=12 layers). That means we can do 12 of the 3’X3′ foot prints and cover 108 square feet (3’X3’X12 = 108 square feet) or approximately one key hole bed (10’x10′ = 100 square feet). The formula calls for 1/2” to 1” on the bottom two layers. If we want to skimp, or if we are short of manure, we could stretch it to 162 square feet or about 1 and ½ key hole beds per yard.
Hay is harder to calculate because it comes in bales that are more compressed than we want. The best I can tell you is that we use about 1/3rd of a 3’X3’X8′ bale per 100 square foot key hole bed. Hay and leaves will decompose in a sheet mulch within a years so we prefer to use larger materials that take longer to decompose.
If you are using wood chips, they come by the cubic yard. In that case, where we want to make the mulch 12” deep, we have three layers in each foot print, so each yard will cover 27 square feet 12” deep. That means, we will need about 3.7 cubic yards to cover each key hole bed that deep.
(Note: At this point in history we are generating huge waste streams of carbon and nitrogen that could be contributing to the fertility of the planet. In a sane culture all of that material would have value. When we develop a sane culture we will have to figure out how to maintain fertility using only the materials generated on site.)
DRIP LINE CALCULATIONS
Laying out drip line requires a calculation of how much water we can deliver over a given area. The variables are 1) the volume of water available at the source of supply, 2) the size of the hose through which the water will be delivered, and 3) the amount of water coming out of the emitters installed on the hose. The variable that allows the least amount of water in the calculation determines the area that can be watered in one ‘zone’. Then we can plan multiple zones to run at different times.
For example, when we were preparing to build a garden at the Crescent Grange, we went to the water source which is a spigot on the outside of the building. We opened the spigot wide to fill a five gallon bucket. It took a full minute to deliver 5 gallons which means that the maximum amount of water that we can deliver to one zone is 300 gallons per hour. (5 gallons x 60 minutes).
We will design for a 3/4 inch supply line that can easily deliver 300 gallons per hour (a 1/2 line will max out at 220 gallons per hour) so our limiting factor will be the length of drip line that we can run without exceeding the 300 gallon per hour available supply. In this case, we are using .6 gallon per hour emitters spaced at 12″ along the line so we can have up to 500 feet of drip line in a zone. (300/.6) Spacing our 1/4″ lines approximately 18″ apart over a typical key hole bed requires approximately 43′ of drip line per bed – or 43 emitters per bed delivering .6 gallons per hour each or 25.8 gallons per hour per bed. 300 gallons per hour divided by 24 gallons per hour per bed gives us 11.6 beds – which we will round down to 11 beds maximum receiving water at any one time.
Generally, I run my drip systems 30 minutes over night. Then, when we have high temperatures and low humidity, I give the garden another 30 minutes during the day. That seems to be “plenty of water” most of the time. Some more detailed observation might allow a gardener to reduce that amount.
Drip Line Options
We can select a 1/2″ drip line with preinstalled emitters on 12″ centers. It is designed for long runs (up to 200′) and few connections (a connection at each end of the run). Another option is 1/4″ line with preinstalled emitters on 12″ centers (6″ centers seems too close to me). 1/4″ line has a maximum run of 30′ and you still need a connection at the end of each run. If you are doing a limited area that is not too big a problem . . . the connectors punch through the 3/4″ supply line and insert into the 1/4″ line with emitters. 3 “U” shaped loops will be sufficient for a typical bed and will be about 43′ of drip line with six connections. In 2011 the 1/4″ line was going for $23.00 for a 100 foot roll. We can also install individual emitters where ever we want them. In that design we run 3/4 inch drip line in a pattern and install emitters on 18″ centers which allows us to plant row crops along the line. Then we install additional emitters and attach 1/4″ “spaghetti” line out to where we want to plant larger plants.
Connecting timers and zone valves are beyond the scope of this garden layout page.

Planting in the Deep Mulch
Building beds can be done any time of year but if you build them right before planting time then you will need to use some specialized planting techniques for planting in newly sheet mulched garden beds. The added soil mentioned in the lower part of the diagram can be garden soil, potting soil or compost. I have a chicken run with a deep litter system to keep the chicken feet clean. I use material screened out from the chicken run.

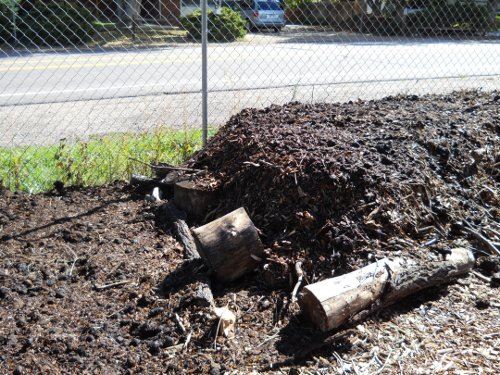
No Weeds and No Pests
The garden in the following picture is built with yard waste according to the information contained in this article. It is a pile of logs, sticks, wood chips on a layer of cardboard with a few layers of chicken bedding added. It is a hugelkulture with a sheet mulch built on top of it. In this garden we do no tilling and no composting. We treat no plant as a weed because we value every plant’s contribution to quorum sensing and the liquid carbon pathway. We treat no insect as a pest because we value every insect’s role in supplying food for the predator insects and birds that are protecting our plants. We cannot have lady beetles unless we grow aphids to feed them.
Nature needs all her parts in order to build fertility into herself cycle over cycle. The worst thing we can do is interfere with that process.
